Showing posts with label DIY. Show all posts

Wednesday, March 6, 2024

Air Cond blower replacement


Well, sometimes it run and sometimes it don't. That's what happened to the car air-cond blower. Not always do not run but I encounter once that the blower stop working during my long distance travel. Luckily it happened at night so I do not feel hot.

Now, searching for the replacement (NEW) is a bit tough. The serial number on the motor doesn't help and the online Toyota database doesn't seems to give any result in the local market. Luckily I contact Denso Malaysia via Shopee and they are very helpful. Double thumbs up to them.

I show them the photo of the blower and they help to find a similar size and type which match the original wiring plug. The blower do not share the same as Toyota Wish but it's the same for Prado rear blower motor.

How about that.

So I bought one from the Denso Official store in Lazada (got more discount than shopee) and the one in the photo, the one on top the NEW and the bottom is the original from the car.

Totally same. Great ! Installed it less than 10 minutes, do not need to do much thing. Just that I am surprise that there is so much dirt and dust collected over the years. 

It is proper to replace it.

Anyway, the parts number is MA116360-12503D, doesn't cost much and you can DIY it. Just 3 screws


Monday, May 22, 2023

Wrong size sun visor

 
Sometimes not all purchase for the car is just plug and play and fit good. This time I make a small mistake. 
It does look the same but nothing is correct with the original. 

The first mistake, the colour is wrong. I got something too beige and not gray enough as the original.

Second mistake, the size. It is much smaller than the original which ended up couldn't even fit the clip at the end. Luckily the screw fit.
This is the comparison between the original and the new.
Here you can see the visor is much shorter.

Anyway, it works and we doesn't look up when driving so we will not notice the problem. So I will be thinking of getting a new one soon. 

Gotta check the size and colour properly next time. Lazada not so good this time.


Saturday, May 20, 2023

Carpet holder


Have you heard this before ? It is something non important before I heard about the stuck carpet that causes accident. This is actually a clip that will fix your carpet at a fix position.

If you have an original carpet that comes with the car, it should have this clip. If you don't then you might need to invest in one. But make sure your carpet have the hole to hold this.

This is how it look when it is fix down. It will make the carpet neat. Before this, the carpet will push up and get folded near the foot rest.

Now, I will be happy that the carpet will stay in place. And you can buy this clip from Lazada for cheap.


Thursday, May 11, 2023

Interior car handle replacement

Do you have the same problem as mine ? The interior handle drop down and it won't retract back up ? It make the interior look messy and old. So after searching in Lazada, I got one of the replacement from China. Cost RM20 each and look great too.
Just use a flat screwdriver to ply it out and you can pull it out later.
The original cover.
The replacement. Colour is different. I bought a beige colour but it look more like light gray.
The colour of the handle look different between the clip and the handle.
This is what happened when pulling the original out. It just broke and the plastic get brittle. 

Hope this will help. It doesn't cost much to make it good. Next is going to buy the driver side sun cover. 

Friday, December 30, 2022

Changed the radiator cap again


I had notice that the spare tank of coolant always have traces of coolant on the lips of it. It dried up and seems like overflow. However the reserve tank doesn't look dirty etc. 

Anyway, I think I just buy a new radiator cap and observe whether it can help or not. Maybe the cap got weak after so many years.

Plus, there is a new design. The symbol look more modern and it have a new part number 16401-36030. I bought one and it does feel great. Maybe it just look new. 

Remember that the cap is for 88kPa.

Good a simple DIY

Wednesday, December 28, 2022

DIY rear door damper


If you bang your head on your rear door mean that you need to replace the damper soon. As the car age, this part will leak and will not support the weight of the door when open to the top.

You just need a flat head screw driver only and you can replace all of it. Just get someone to hold the door for your as safety.

Photo of the leaking original damper
Another view at the middle part


The top
By inserting the flat head screw driver at the angle as specify to remove the clip
The clip will come out and you can pull it out. No need to use hammer or anything hard to hit it. Else the door will misaligned.
Another view.

Get a new set from online shop, I got mine from Lazada. It is not the original but seem like many ppl have purchase it and give it a 5 star. Have a try. It is not too expensive.

Weird that it have a date stamp on the damper as per photo above.

Top view

Bottom view.

Overall, satisfy with the purchase and it does fit properly. I give it a 4 star. 

Monday, September 23, 2019

DIY front glass and dashboard sound proofing

Continuing from the DIY of the sliding door, bought a rubber strip (Made in Korea) which claimed to be better than (Made in China) to be put between the dashboard and the front glass. Just a simple DIY that stuck the rubber at the end of the dashboard and done.
Result is good, less rattling of the dashboard and some differences in sound. Worth the upgrade DIY on this price.

Monday, September 16, 2019

DIY sound proofing sliding door and rear door

It's a boring weekend, hence internet surfing online shopping portal, saw some DIY rubber sealer so decided to have a try on it. Bought a small length of it together with a bottle of 3M primer to get a better seal.
 The rubber is a B type which seems to be a bit better to keep dust and sound out of the car.
Stick to the lower half of the sliding door and this is after cleaning, the parts with soap and water and alcohol to remove any dirt and put some primer (3M), let it dry a bit before sticking the rubber.

After finishing the door, got some left over of the rubber and use the balance on the rear door. Only stick to the bottom of the door and not the side as I believe it is not usable or pointless to do the side.

Went for a test drive and feel just minor difference in sound, is it worth it ? Not sure but it does fun.


Wednesday, February 20, 2019

B pillar door insulation

Have you seen one of these ? I saw them once before and it doesn't come cheap many years ago. Previously it was advertise manufacture by Korean but now the chinese produce them too, and it is cheap.
Hence I decided to buy one to try it on the car. Price is so affordable, but when I received it, it was a bit shorter than I think. 80cm for both strips instead of 80cm for 1 strip. However it is adequate for Isis. The sliding door on the Isis have good insulation on the left hand side panoramic door so the strips are good for 1 door.
I had install it on the car, 1 strip for the top and 2nd on the bottom, the curve on the middle part of the door seems trick to install as the strip doesn't bend well. After installing, there are a small gap of 1cm between both, but I am ok with it.


The cross section of the strip are as below. Inside is a metal clip to keep it in place on the door position. No glue or sticker are required, I prefer it that way.

Now what left is the road test to see will it block some wind noise. I will update soon on the result.
If you wanted to buy one, just search for B pillar insulation from any online store. Small sum for some easy DIY.

Wednesday, April 5, 2017

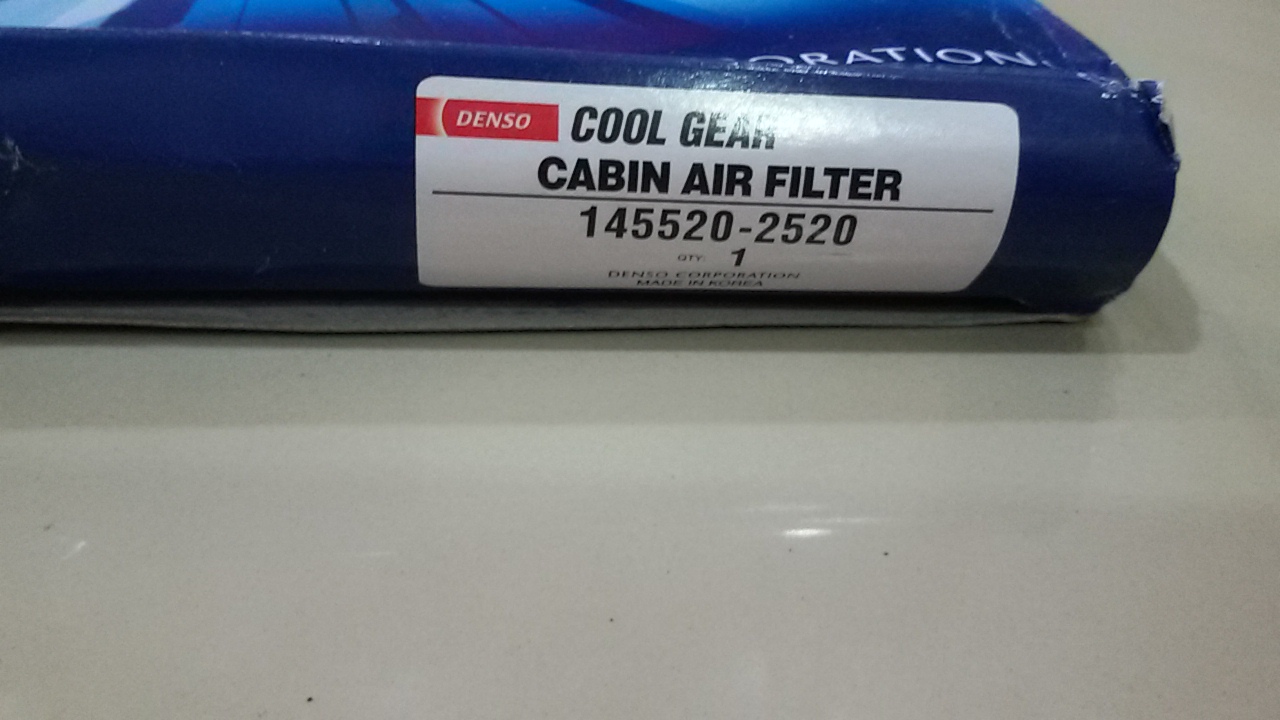
Denso Cool Gear Cabin Air Filter

 
Do you feel that your air cond is not performing well and the air blown are weak ? Maybe it is time to change your cabin air filter. As you know, all the modern car come with cabin air filter to purify the internal air circulation and it is important to change the filter once a while to ensure optimum air circulation of the car.
In my previous post, I had changed the cabin air filter to Denso premium filter which cost quite a lot however, recently during my internet searching, I found that Lazada does sell cabin air filter by Cool Gear (Denso) for sale and it cost very much less than the original.
Cool Gear is a sub brand for Denso and it sell parts at the more affordable price and since the price is almost 2 or 3 times less than the original parts, I try it out and buy one online and get it delivered to me within a week. It does fit well after installation and out comes the old filter which is colour black rather green (Original).
I would recommend getting this parts rather than OEM as this parts are still manufactured by Denso subsidiary so quality wise should be better than OEM. For Malaysian, you can buy this via lazada and you can get some discount too with free delivery too.

Cool Gear part number : 145520-2520 Product Made in Korea

Previous post on Cabin Air filter :-
http://toyotaisis.blogspot.my/2014/09/denso-carbon-filter.html
http://toyotaisis.blogspot.my/2011/11/changing-air-cond-filter.html


Thursday, November 13, 2014

Toyota Isis DIY DVD

 
There is always something for everyone and in Japan the people there never stop to surprise me with new innovation and products for the masses. I know that many car owner like to DIY around their car and I am one of them but many times we face problems of what is the proper steps to DIY. We worried that we might break something if we didn't do it the right way. Hence someone in Japan will show it for you via DVD.
Since it was done in Japanese for Japanese don't expect you could understand much before you learn how to listen Japanese. Anyway, it is much better than looking or reading via books and catalogue which most probably in Japanese too.

Cost ? Around JPY3,000, not that expensive since the Yen had drop so much in the recent months.

The video above is for a short sneak peek on what and how they present the DIY.

Links to original page in rakuten Japan :-
http://item.rakuten.co.jp/auc-mkjp/dvd-toyota-isis-zgm15w-01/

Friday, July 13, 2012

Fuse Blown and replaced

  
Above is a picture of a 15amp fuse that were blown today and were replace with a replacement fuse costing RM1.00. What trigger this ? I not pretty sure, as I suspect something funny when I am driving today as my Blitz R-Vit is not working and my wing mirror won't function at all.  It won't fold or the mirror cant be move using the side door control.
So here is the actual image of the fuse box inside the car behind the glove compartment. You can read about how to reach this area in my previous post of replacing your air cond filter.
You may ask which one to change in all this fuse, I have similar problem this morning as I can't find the correct fuse based on my search in the Internet or my electrical and wiring guide. Hence by luck, I found the problem fuse which is the 15 amp fuse on the left row (4th from below including the empty slot)
If you are having similar problem with your cigarette socket or wing mirror not working. Just try to ply this fuse out and have a look. It is best to use a thin head plyer as the space is a bit cramp and your hand might not reach it properly.

Monday, May 7, 2012

Blitz R-Vit


If you are an owner of Isis, you will notice that the car didn't come with a water temperature gauge, although this is a common practice on all new japanese car but I still prefer to know what's the water temperate while I am driving.
Why ? Because I had a bad experience with my other car which resulted the engine overheated and stranded me somewhere in the highway.
Lucky for me, I manage to get myself a Blitz R-Vit from my other car and installed it into my Isis. This devices comes with 3 set of wiring, one from the OBD port, the other one from the cigar lighter plug and last if for the device itself.
I prefer a clean interior and hide all the wiring away from view hence I cut a hole from the button cover and pull the wiring inside the dashboard. The display itself was glue on using double sided tape. So far the double sided tape works even on hot weather.
Next is the power point, I route the wiring into the cup holder area and last is the OBD port wiring that I hide all behind the dashboard. A cable tie secure everything behind. Toyota Isis OBD port are located at the bottom of the dashboard (driver side) next to the latch to open the bonnet.
R-Vit is capable to display up to 6 parameter of your choice in the same time, but I prefer to show on 3 parameter as the display is rather small and bigger font does help during viewing.
The parameter that I choose for Isis is "Gear", "Water Temp" & "ATF Temp". It is good to know your ATF oil temperature to help you guard and save your gearbox from going bad. High ATF temperature will shorten the lifespan of your gearbox. Repair of gearbox is costly and it is not easy too.

Saturday, April 21, 2012

Replacing air filter

Do you know that using a clogged or dirty air filter will affect your fuel consumption ? Thats what happening to my car now. It clock 30k and I haven't change my air filter from day 1, so recently I went to my favourite spare part shop in Sentul and bought myself a Original Air Filter for Toyota Isis. I do expect that the air filter is the same parts as being used in the 1.8l Toyota Wish, after checking the parts catalogue the boss told me that it is the same. The air filter cost RM70.00 and made by Denso Japan. Parts number is 17801-22020.

I had snapped some photo of the before and after condition of the air filter. The darker on the top air filter is the original and replaced air filter while the bottom white colour is the new air filter. I yet to test the mileage I will get after changing this, but I expect some slight increase in power and mileage. For those who experience some drop in performance and mileage per tank, try to check your air filter and replace if necessary. Happy DIY.